Optional - Install Redis
| Application Data | |
|---|---|
| Name | Redis |
| Version | Use Latest |
| Arch | 64 bit |
| Description | Redis is an open source in-memory data structure store |
Redis is an open source in-memory data structure store that is designed to be
fastandsimple. The name is an acronym forRemote Dictionary Server(pronounced "red-iss"), referencing the networked client-server and key-value data models that Redis uses.Built for
real-time performancemost requests to Redis complete in less than amillisecond, allowing a single server to handlemillionsof concurrent requests every second. Redis is designed for simplicity; it’s easy to use and extends the developer's toolbox by managing a distributed store of data structures used by applications. Redis includes everything needed to run it—whether on a developer's workstation or in ahighly availablelarge-scale production environment—and is renowned for itsrock-solidstability. It is used as a database, cache and a message broker wherever performance is key.--Redis Labs
Table of Contents
- System Requirements
- Base System Hardware
- Windows Installation vi Docker Container
- Native Linux and WSL Installation
Requirements
Redis runs best on Linux | Unix based systems, and it is NOT recommended for Native
Windows. See Reasons Why Not Windows
for a more in-depth explanation. If you need assistance installing WSL, see
Installing Windows Subsystem for Linux Installation
from the JTSDK Net Core Project Wiki.
Base System Hardware
- Multi-Core CPU (more is better)
- At least 500MB
free-memory(more is better) - An empty instance uses ~ 3MB of memory.
- 1 Million small Keys -> String Value pairs use ~ 85MB of memory.
- 1 Million Keys -> Hash value, representing an object with 5 fields, use ~ 160 MB of memory.
- 10MB, or more, Disk Space for initial installation
- Internet Access is a must have for installation
NOTE: While it's possible to run
redis-serveron small embedded devices such as theRPI 2|3or similar ARM based computers, performance for demanding applications will be sub-par. If you want to take advantage ofRediscapabilities, using embedded devices is not the preferred approach.
Install via Docker Container
By far, the easiest way to test applications with Redis on Windows is by using a pre-build Docker Container. It's quick, easy, and maintained by the Docker community.
To use Docker Containers, you must first Install Docker, and preferably, create a Docker Hub Account (why not, it's free). Follow the next few steps to create your account, and install docker
NOTE: This is a good time to check out the Getting Started and read through their FAQ.
Now that you've Installed Docker,
you are ready to pull and run the 5.0-Alpine Docker image. There are many
Docker Redis Images to choose from, but,
I find the small footprint (~95MB) of Alpine to be perfect for application
testing.
Install Steps
- Open a Windows Console (Windows CMD or Powershell), and type the following:
NOTE: make sure Docker is running before issuing the following command(s).
# In Windows Powershell or CMD Console, type:
#
# Note: 5.0.3 may not be the latest revision. Always check for the latest version
# at: https://hub.docker.com/_/redis/ and substitute as required.

docker run --name 5.0.3-alpine -p 6379:6379 -d redis
You should now have a Redis Docker Image running on your system. To do a few
checks, run the following commands.
In Windows Powershell or CMD Console:
# Check Docker disk usage, type
docker system df
Get the Redis Alpine Container Information
# Grab the Container Information, type"
docker ps

# Check the Image, Status, Port and Name. Should be similar to:

Image....: redis
Status...: Up xx minutes
Ports....: 0.0.0.0:6379->6379/tcp
Name.....: 5.0.3-alpine
This concludes the Docker Redis Installation section. If you reboot your system.
re-run the install command from able to re-start the instance.
Linux and WSL Installation
This installation process describes using Ubuntu 16.04 thru 18.04
or Windows Subsystem Linux. Other Linux based distributions will
be similar. There is NO need for a Password, Port re-assignment, IP address
re-assignment, nor HTTPS setup. A default, out-of-box install, is all that is required for testing.
Ubuntu or WSL
Open WSL or Linux Terminal and type the following in the shell:
# In the bash terminal (for Debian|Ubuntu based systems)
sudo apt update
sudo apt install redis-server
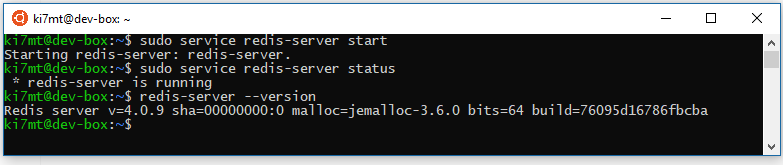
sudo service redis-server start
sudo service redis-service status
redis-server --version
If the above commands were successful, you should have the following results:
NOTE: With WSL, each time you close and re-open the session, you must restart any servers you wish to run as they do not automatically start. On a normal Linux instance, this is of no concern as they are managed by system control.
 |
|---|
| *Redis Startup * |
Initial Testing
The following tests your ability to enter and query small <key>:<value> pairs
in the new Redis Server. All commands are in the terminal
- At the command prompt type
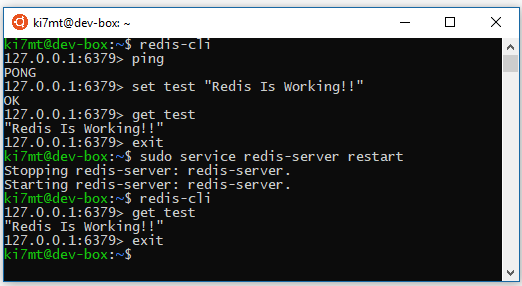
redis-cli
- At the redis prompt type:
# Note: 127.0.0.1:6379> is the redis prompt, you do not type that part.
127.0.0.1:6379> ping

# Output should be: pong
- Add a
<key>:<value>pair
127.0.0.1:6379> set test "Redis Is Working!!"

# Output should be: OK
- Retrieve the
<key>:<value>pair with:
127.0.0.1:6379> get test

# Output should be: "Redis Is Working!!"
- Exit the
redis-cliclient
127.0.0.1:6379> exit

# You should now be back at the Linux prompt
- Restart Redis Server
# At the Linux prompt, type

sudo service redis-server restart
- Open Redis Client and Check previous data
redis-cli
127.0.0.1:6379> get test

# Output should be: "Redis Is Working!!"
- Exit the Redis CLI
# Exit redis-cli
127.0.0.1:6379> exit

# You should now be back at the Linux prompt
Test Result Summary
 |
|---|
| Test Results |
Conclusion
This concludes the basic installation and testing of the redis-server. Redis
is a highly capable <key>:<value> store used by thousands of enterprise
applications. For further learning, checkout the following resources: